And so it begins

porthole

Retired
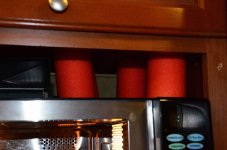
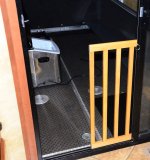
Another dog mod. The dogs go in the garage when wet or sometimes just to give us some room. The slider has a screen door, but I don't like using it for the dogs. We had been using a partial baby gate but that was becoming a pain always taking it in and out.
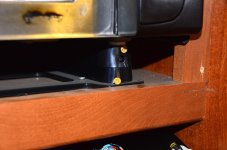
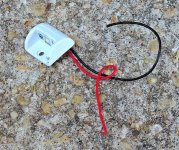
I cut it down to about 1/3 and drilled 2 holes in the slider and the gate. Using ball detent pins the gate now stays fixed to the door for easy in and out, but can be removed quickly for full access.

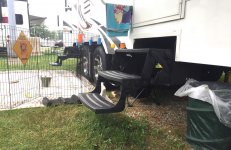
Hard to see, but in the background you can see two 10' and one 8' J wrap panels for the Cyclone in the garage. Picked them at Heartland parts on the way home. These would cost a bundle to ship.
 

Attachments

  • Gate.jpg
    Gate.jpg
    115.6 KB · Views: 167
Last edited:

porthole

Retired
The microwave fell off it's mount again on the way to Dover. This time I ran screws through the front feet and from the mount to the cabinet base. I can't get to the rear of the mounting plate though.
I had been using cut pieces of foam pool noodle jammed above the micro and the top of the cabinet. This would work for awhile then the micro would pop off again. Turns out the pressure applied by the noodle pieces was enough to start distorting the cabinet floor :mad:
 

Attachments

  • Micro 1.jpg
    Micro 1.jpg
    134.2 KB · Views: 112
  • Micro 3.jpg
    Micro 3.jpg
    113.5 KB · Views: 107

porthole

Retired
I had a RVLock V2 that stopped working (for the 2nd time) that I replaced with a Version 4 lock. That version works pretty good. While at Goshen Lippert swapped out my bad V2 model. Although they only a like model to exchange, no upgrade available. So now we have remote locks on each door and two different colors. I may get adventurous like Jamie did and disassemble and paint it, or maybe not........
 

Attachments

  • RVLock.jpg
    RVLock.jpg
    98.4 KB · Views: 129

porthole

Retired
Goshen Rally special - aluminum tread quad steps.
Supposedly, these can only be used to replace current quad all steel steps on trailers with 12" frames. Disappointing to hear having 3 steps now on a 10" frame. Jim got the product blueprint posted here and a tape measure showed that it should work.
We signed up early and were hoping for two sets if it worked.

Well as it turns out, the steps fit fine on a 10" frame Cyclone, probably better then on a lot of the trailers. There was no banging, hammering or cutting to install. Although the Lippert tech had his work cut out for him. Cyclones have J-wrap that goes all the way to the frame that needs to be cut for access. Plus our rear door has body damage, right where you need to get to for the bolts.
Having two steps will make differences stand out. The front step has 7 out of the 8 rubber strips cut short. The rear step is perfect.

The steps are a bit difficult to open and close, hopefully they will loosen up a bit and one step needs the relief cut widened a bit to keep from binding.

But, my overall goal was achieved. Going from 3 steps to four means we may never have to use a step stool to get to the bottom tread now. Normally when the trailer is leveled in our driveway, the rear step is about 16" off the ground.
 

Attachments

  • Quad_steps_4.jpg
    Quad_steps_4.jpg
    253.5 KB · Views: 194
  • Quad_steps_5.jpg
    Quad_steps_5.jpg
    260.5 KB · Views: 199
  • Quad_steps_6.jpg
    Quad_steps_6.jpg
    774.7 KB · Views: 192
  • Quad_steps_7.jpg
    Quad_steps_7.jpg
    504.7 KB · Views: 181

porthole

Retired
Storage bins.
I'm sure many of the folks at Goshen did not know that everything in the Lippert catalog had a special Heartland Rally price.
I knew there were longer storage bins available, but they are pricey and not cost effective to ship.
Our Cyclone originally came with these bins (shortly after ours was built one of the improvements was eliminating them from production). At a previous Goshen rally I picked up a second set of bins, as they come in very handy. What I didn't know then was that there were two versions available and after buying the short version and then seeing the long style I tried to get Lippert to exchange. Lippert refused to exchange or credit for the bigger version.

Seeing a rally price for the bins this year I bought a long bin kit. These bins are great for keeping the sewer stuff in as well as anything that you may need to keep handy, or wet - muddy stuff.

I now have a spare long bin bracket with 2 short bins for sale. I will be listing them on the for sale thread and could deliver to a rally near you :rolleyes:
 

Attachments

  • Storage_bins_7.jpg
    Storage_bins_7.jpg
    730.1 KB · Views: 387
Last edited:

Jimsryker

Well-known member
Who advised against it? Same people that advise lifting a trailer with LevelUp?

As to how I have it done, don't think I would change anything, other then the upper attaching points on the inner frame, but it works well as is. I use chains with hooks that are set for the length I need.

BTW, the most I have had on my ramp is a 900 pound bike or the electric cart. The ramp flexes some with either, so I doubt i would ever try 2000 pounds.

Duane, by changing the attachment points, did you mean you would move it to the corner points like the production models have it? I am about to take this on and wanted to clarify. See attached photo. It's 1/8th steel like the production models but they definitely feel stouter. Frame wise that is. I'm really concerned with stressing the frame and I have no idea on how it's attached to the overall chassis. BTW, I mentioned "over 2000 lb." because of the sticker in the garage stating that 2500 lb. max was the load you could put in there. If I could drive a side-by-side up that ramp, I think it could handle two or three adults. I held the end of the beaver tail and had Christine walk out on it. I felt no real weight until she got past the halfway point and even then, not that much.

20150728_181432_resized.jpg
 

Bones

Well-known member
Storage bins.
I'm sure many of the folks at Goshen did not know that everything in the Lippert catalog had a special Heartland Rally price.
I knew there were longer storage bins available, but they are pricey and not cost effective to ship.
Our Cyclone originally came with these bins (shortly after ours was built one of the improvements was eliminating them from production). At a previous Goshen rally I picked up a second set of bins, as they come in very handy. What I didn't know then was that there were two versions available and after buying the short version and then seeing the long style I tried to get Lippert to exchange. Lippert refused to exchange or credit for the bigger version.

Seeing a rally price for the bins this year I bought a long bin kit. These bins are great for keeping the sewer stuff in as well as anything that you may need to keep handy, or wet - muddy stuff.

I now have a spare long bin bracket with 2 short bins for sale. I will be listing them on the for sale thread and could deliver to a rally near you :rolleyes:


Did you post the bins yet? how much might you be looking for them?
 

porthole

Retired
Couple of months ago I picked up a Vizio sound bar for the house TV.
Before hooking it up I decided it was not going to be what I was looking for with the main TV.

But, it just happened to fit under the TV in the Cyclone. Just had to make some room for it, which required moving the SAT antenna control box and doing something with a to big DVD player.
I picked up a much smaller Sony BluRay player and made a shelf for it under the TV. The sound bar fit with just over an inch to spare.
The shelf is a standard 12" "finished" shelf from Home Depot with a near perfect color match.

Now the dogs can listen to satellite radio when we are out.

OK, the multi reply is a nice feature that could be better if you could turn it off :mad:
 

Attachments

  • Cyclone_AV_soundbar.jpg
    Cyclone_AV_soundbar.jpg
    74.2 KB · Views: 122

porthole

Retired
One of my mud flaps was ripped off by the tire blowout, including a 1/4" piece of aluminum angle. And, where the angle ripped off the frame it bent the web a bit!
New piece of aluminum and new universal Duraflap mud flaps.
 

Attachments

  • Cylone_mudflaps.jpg
    Cylone_mudflaps.jpg
    139.1 KB · Views: 115

porthole

Retired
Re: And so it begins - mods to personalize the rig

Vent cover -LED's and Red Solo Cups ................

Since our trailer is older, these roof vent issues are not an issue :rolleyes:

Just put our third vent cover on. I used the Traveling Vent cover version. This particular version was originally purchased in parts unknown, made it's way to the Goshen for sale table, then under the table, then a tug-o-war between potential buyers, then it traveled to other parts unknown, including I believe Mississippi and Louisiana, then back north to upstate New York and finally resting at the Jersey Shore. It may take 2-3 years before this cover sees as many miles on the roof as it has seen under a roof.

- - - Updated - - -

While at Goshen one of the Heartlanders parked next to us decided to lighten his cargo load for future travels, so he gave me a package of 198 style LED bulbs (thanks again Eric).
There were just enough to replace two bulbs that I had just burned out on the golf cart and to replace all the amber lights on the Cyclone.
I had a few red LED 198's for the motorcycle in stock, so they went in the rear marker lights.

- - - Updated - - -

Upgraded my fine glassware for evening libations.
 

Attachments

  • Cyclone_roof_vent.jpg
    Cyclone_roof_vent.jpg
    67.9 KB · Views: 103
  • Cyclone_rear_LEDs.jpg
    Cyclone_rear_LEDs.jpg
    64.3 KB · Views: 118
  • Red_solo_cup.jpg
    Red_solo_cup.jpg
    127.2 KB · Views: 119

porthole

Retired
Re: And so it begins - mods to personalize the rig

WiFi Ranger and cell stuff added.
Headed to Dog camp this week. In the past we would literally have to walk to the top of the hill to get cell service. It is getting better though. WiFi is what you would expect at a kids camp, there but not that great.
So, that and Kevin B's mention that wifi was about non existent at the Massachusetts rally ............ well I finally broke down.

Installed Wifi Ranger's Elite FM pack, basically a WiFi Ranger outdoor router and antenna (roof mount, receive and broadcast) and an indoor Go2 router (also over the air receive and broadcast), with Verizon's newest USB 620L modem for the Go2's USB port. Also added a cell antenna to the roof.

WiFi stuff is from WiFIRanger.com. Cell antenna and low loss coax ($$$) is from the 3gStore.com

This "stuff" is all supposed to work in concert with with each component, with a preference for wifi over cell usage. Lots of settings in the web based control panel too.

1st pic
Roof top mount of the WFR Elite router (left) and cell antenna for the USB modem. The rooftop Elite is POE, power over ethernet for it's supply voltage. It gets it's POE from the indoor Go2 router (separate POE port)

2nd pic
WFR Go2 router with a Verizon USB modem and external antenna adapter --> low loss coax to roof.

3rd pic
Currently a useless switch. I installed the router to run off of 12 volts DC, this switch was for a convenient way to turn off the routers and cell modem (powered by the indoor router).

After about 24 hours of running, the routers stopped working. Traced it to the 12 volt supply. I replaced the cable and still not working. Switched to the AC power brick adapter and all is fine. The 12V DC is good up to the plug, but for some reason not powering through to the router. Makes no sense and I have a support ticket in to WiFI Ranger.

Another issue I have not resolved yet is getting the roof top Elite router to continually be visible in the available connections (also a service ticket).
 

Attachments

  • WiFi_add_ons_01.jpg
    WiFi_add_ons_01.jpg
    78.4 KB · Views: 133
  • WiFi_add_ons_02.jpg
    WiFi_add_ons_02.jpg
    549.7 KB · Views: 127
  • WiFi_add_ons_03.jpg
    WiFi_add_ons_03.jpg
    393.7 KB · Views: 120

Bones

Well-known member
Re: And so it begins - mods to personalize the rig

WiFi Ranger and cell stuff added.
Headed to Dog camp this week. In the past we would literally have to walk to the top of the hill to get cell service. It is getting better though. WiFi is what you would expect at a kids camp, there but not that great.
So, that and Kevin B's mention that wifi was about non existent at the Massachusetts rally ............ well I finally broke down.

Installed Wifi Ranger's Elite FM pack, basically a WiFi Ranger outdoor router and antenna (roof mount, receive and broadcast) and an indoor Go2 router (also over the air receive and broadcast), with Verizon's newest USB 620L modem for the Go2's USB port. Also added a cell antenna to the roof.

WiFi stuff is from WiFIRanger.com. Cell antenna and low loss coax ($$$) is form the 3gStore.com

This "stuff" is all supposed to work in concert with with each component, with a preference for wifi over cell usage. :Lots of settings in the web based control panel too.

1st pic
Roof top mount of the WFR Elite router (left) and cell antenna for the USB modem. The rooftop Elite is POE, power over ethernet for it's supply voltage.

2nd pic
WF Go2 router with a Verizon USB modem and external antenna

3rd pic
Currently a useless switch. I installed the router to run off of 12 volts DC, this switch was for a convenient way to turn off the routers and cell modem (powered by the indoor router).

After about 24 hours of running, the routers stopped working. Traced it to the 12volt supply. I replaced the cable and still not working. Switched to the AC power brick adapter and all is fine. The 12V DC is good up to the plug, but for some reason not powering through to the router. Makes no sense and I have a support ticket in to WiFI Ranger.
Looking good
 

porthole

Retired
Re: And so it begins - mods to personalize the rig

Years ago we had an aerial truck, an Oskosh Snorkel, that had a side light mounted over the rear tandems that only came on with the right or left turn signals. It was great for seeing the tire location relative to obstructions.

One night an inattentive car driver took out the light on the right side. The township management thought the best use of the insurance money was to put it in the general fund and not repair the fire truck.

I have missed that light for 20 years .....

Always thought it would be really helpful on the Cyclone, since we do travel at night. The last 2 miles to our house have several turns that would really benefit from an "over the wheel light" at night.

I tried a couple different eBay timers with no luck.

This control was made up from ideas on the 12 volt forum.

Underneath all the shrink tubing is a standard automotive type relay, a diode, some resistors and a couple of capacitors.

The control is fed B+ from the side marker light, so it will only activate if I have the lights on.

The signal to activate is received from the right side turn signal light I added some time ago.

If the side lights are on and the turn signal activated, 12 volts is sent to the relay and capacitors. The capacitors store energy for a brief amount of time (based on the load they are supplying e.g. the LED).

The capacitors activate the relay, which in turns activates the light.

Each time the turn signal blinks it recharges the capacitor, kind of like a titled cup under a faucet. Water is always running out, but the faucet keeps it flowing.
Once the turn signal feed stops the capacitors bleed off and the light goes out.

It took a bit of trial and error to get the right size capacitors, resistors and diodes as well as a light that was bright enough but did not drain the storage to quickly.
The LED is a marine grade ($$$) very bright item.

Testing works pretty good, the light stays on for about 1-2 seconds after the signal goes out.
I'll try and do a video when we hook up for a trip this week.

Video
 

Attachments

  • RS_wheel_light_1.jpg
    RS_wheel_light_1.jpg
    279.7 KB · Views: 94
  • RS_wheel_light_2.jpg
    RS_wheel_light_2.jpg
    368.4 KB · Views: 86
Last edited:

OEFVET

Well-known member
Re: And so it begins - mods to personalize the rig

WiFi Ranger and cell stuff added.
Headed to Dog camp this week. In the past we would literally have to walk to the top of the hill to get cell service. It is getting better though. WiFi is what you would expect at a kids camp, there but not that great.
So, that and Kevin B's mention that wifi was about non existent at the Massachusetts rally ............ well I finally broke down.

Installed Wifi Ranger's Elite FM pack, basically a WiFi Ranger outdoor router and antenna (roof mount, receive and broadcast) and an indoor Go2 router (also over the air receive and broadcast), with Verizon's newest USB 620L modem for the Go2's USB port. Also added a cell antenna to the roof.

WiFi stuff is from WiFIRanger.com. Cell antenna and low loss coax ($$$) is from the 3gStore.com

This "stuff" is all supposed to work in concert with with each component, with a preference for wifi over cell usage. Lots of settings in the web based control panel too.

1st pic
Roof top mount of the WFR Elite router (left) and cell antenna for the USB modem. The rooftop Elite is POE, power over ethernet for it's supply voltage. It gets it's POE from the indoor Go2 router (separate POE port)

2nd pic
WFR Go2 router with a Verizon USB modem and external antenna adapter --> low loss coax to roof.

3rd pic
Currently a useless switch. I installed the router to run off of 12 volts DC, this switch was for a convenient way to turn off the routers and cell modem (powered by the indoor router).

After about 24 hours of running, the routers stopped working. Traced it to the 12 volt supply. I replaced the cable and still not working. Switched to the AC power brick adapter and all is fine. The 12V DC is good up to the plug, but for some reason not powering through to the router. Makes no sense and I have a support ticket in to WiFI Ranger.

Another issue I have not resolved yet is getting the roof top Elite router to continually be visible in the available connections (also a service ticket).


Duane,

How is the wifi range extender working? I am very interested in this mod.
 

BLHFUN

Well-known member
Re: And so it begins - mods to personalize the rig

Underneath all the shrink tubing is a standard automotive type relay, a diode, some resistors and a couple of capacitors.

The control is fed B+ from the side marker light, so it will only activate if I have the lights on.

The signal to activate is received from the right side turn signal light I added some time ago.

If the side lights are on and the turn signal activated, 12 volts is sent to the relay and capacitors. The capacitors store energy for a brief amount of time (based on the load they are supplying e.g. the LED).

The capacitors activate the relay, which in turns activates the light.

Each time the turn signal blinks it recharges the capacitor, kind of like a titled cup under a faucet. Water is always running out, but the faucet keeps it flowing.
Once the turn signal feed stops the capacitors bleed off and the light goes out.

Yes please. I'll take two! :) Any chance you can get a little more granular on the Parts when you take the Video? We drive at night as well.. This is an excellent idea.
 
Top