And so it begins

Bones

Well-known member
Half trailer mod, half trailer repair.

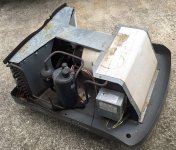
While we were at the Dover race, my new Brisk Air II Dometic AC unit, ducted grill kit, heat strip and CCC2 t-stat was delivered.
I managed to get the rooftop unit replaced before leaving for the PA rally and "attempted" to finish the install.
Turns out the CCC2 multi zone thermostat requires a specific additional controller, no matter what the people at PPL RV parts tell you.

That controller was delivered to the PA Rally campground and I was able to finish the job before two days of rain. The modification part is going to the digital thermostat. If you have heat strips the $20 digital thermostat mod does not work.

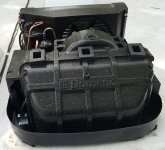
The new AC is well insulated with form fitting styrofoam covers.
#1 top insulation cover off
#2 new heat strip
#3 Heat strip is mounted to the evaporator, so all air always blows over the heat strip
#4 New style controller mounts up here instead of just above the ducted grill

#5 The insulation almost snaps on, an interference fit
#6 Wires are no longer buried under the covers, they get taped in place here
#7 & 8 the Brisk Air II is 4-6 inches shorter and looks higher, will have to do a new trailer height measurement now.

#9 Old AC and thermostat had a 6 wire cable connecting them. Wires under screws at the t-stat and butt connectors up in the roof unit.
#10 The CCC2 t-stat uses a 4 wire phone wire. I picked up a double phone jack wall plate locally and used those for the new interface. The new T-stat also requires a much bigger hole for the mounting plate
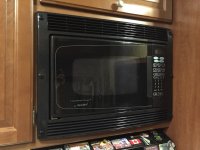
#11 Up and running


This thermostat adds several options over the single zone version, even if only using as a single zone. The two main features are an "auto mode" that will switch between AC and heat as needed, although it takes the furnace as priority then the heat strip and a 3 speed fan mode, that also works in an auto mode.

The 3 speeds seem to be a high, higher and highest. It certainly does not come down to an "idle speed"
Noise seems to be a bit more then our original unit, even at the lowest speed. But, the trailer doesn't rumble anymore when the compressor kicks in.

The heat strip worked great for the remainder of the rally weekend.

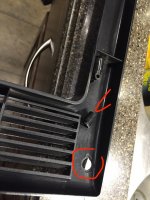
I really like the heat strip idea for the air units. Nice job on the water mod and the air conditioning unit.
 

porthole

Retired
We have heat strips in both units, use them all the time.
I ordered the trailer with heat pumps, but there was a fire at the plant in Mexico, so the heat strips were done at the dealer. They do a good job and work in any temp, unlike heat pumps. Realize though that heat being blown down is not quite as effective as coming up from the floor.
 

Bones

Well-known member
We have heat strips in both units, use them all the time.
I ordered the trailer with heat pumps, but there was a fire at the plant in Mexico, so the heat strips were done at the dealer. They do a good job and work in any temp, unlike heat pumps. Realize though that heat being blown down is not quite as effective as coming up from the floor.

True But I'm thinking that they would work good when the temps do dip a bit at nights towards the beginning and end of season camping trips
 

porthole

Retired
I should try and clarify that. Heat pumps are not very effective once the temp starts dropping below 40.

The heat strips work all the time. It just may take longer to get the benefit.
If you run the heat strips before you actually need them, they work great. And they are cheaper then the heat pump option.

We'll probably have at least one in the next trailer. We also do not have a fireplace in the Cyclone - yet.
 

porthole

Retired
Re: And so it begins - mods to personalize the rig

At Goshen several rallies ago I spent a ridiculous amount of money on LED's to replace the bayonet style bulbs.

2 sets, two different color temps.
The warmer lights in the main living area are still going strong.
The brighter, whiter LED's in the garage were replaced before we even left Goshen.
Replaced again under year for failing and that set of 6 have also failed.

Got these on evilbay, $31.24, shipped on a slow boat from China. 10 LED's per set. So far - so good. Just got a second set of 10 to finish replacing the rest.

$3.10 per piece is way better then the $14-18 per I have seen elsewhere.

That link won't work forever, this is the LED title:

10x BA15S 1156 1141 LED bulb 18-5050 SMD AC/DC 12-24V Super Bright ,White #ZA
 

porthole

Retired
Re: And so it begins - mods to personalize the rig

New versus old Dometic AC, insulation comparison.
 

Attachments

  • Dometic_AC_old.jpg
    Dometic_AC_old.jpg
    201.3 KB · Views: 104
  • AC_15K_&_T-Stat_05.jpg
    AC_15K_&_T-Stat_05.jpg
    503.9 KB · Views: 106

porthole

Retired
Re: And so it begins - mods to personalize the rig

So far this year it seems to be about 50/50 between the roof top SAT dish and the portable (or not at as this past weekend).
Needed to have the dish someplace a little more convenient other then strapped down on the top bunk.

A piece Starboard (marine grade PVC material) screwed to the bottom of a floor joist to catch one end of the dish and a piece of angle aluminum on the outer floor joist to catch the other end.
I put a screw and locknut on the outer piece. The dish slides in, rests on the inner support then I push up and pull over the nut to hold the outer end.
 

Attachments

  • SAT_dish store.jpg
    SAT_dish store.jpg
    61.5 KB · Views: 71

porthole

Retired
Re: And so it begins - mods to personalize the rig

We have ended up using the Dyson stick vac more and more, and judging by the amount of times I have to dump it, it works pretty good. Normally stored in the garage I needed a convenient place for daily use.
I had an extra charging station which I mounted to the slim space between the slide and patio door.
Drilled a small hole through the wall between the patio door and outside wall, cut the wire and then lengthened it using telephone cable and a soldering gun. They are very fine wires.

Of course we have to remember to make sure the beater bar clears if we were to close the slide. But it can stay there even closed. Having it handy now makes using it a more frequent occurrence.
 

Attachments

  • Dyson_move.jpg
    Dyson_move.jpg
    66 KB · Views: 83

OEFVET

Well-known member
Re: And so it begins - mods to personalize the rig

I was looking to get that model dyson but wasn't sure how good it was. Since you say it works well I will add it to my list and install somewhere in the garage area.


Sent by NY Horse Holder
 

porthole

Retired
Re: And so it begins - mods to personalize the rig

That is not the Dyson Heartland supplies. They offer the lowest end model, this one is 2 grades above I think.
The newer one, "animal" although pricey, is supposed to be even better.

You are welcome to try it at Lake George if you like. I'll even show ya how to clean it out real good :rolleyes:
 

OEFVET

Well-known member
Re: And so it begins - mods to personalize the rig

I know Duane, I have been looking at the animal one for some time now.


Sent by NY Horse Holder
 

Carleen

Well-known member
Finally - found a place for a air hose reel! I bought a Porter Cable compressor when picking up the trailer, this one is rated at 150psi.

Since the basement wall was off for access with the Level Up install I finally found room. There is about 8-9 inches of space between the generator housing and trailer side wall.
I got the reel shown from Home Depot. Amflo reel with 50' of 3/8" hose and connector hose.

I removed the electric landing gear switch and cut in a door with rollers. I had this leftover from my power cord reel install.

I had some PEX tubing and fittings laying around so I piped the air line with it. Don't know how it will hold up, but in the 5 hour 150psi test it did fine. I double crimped each connection.


THAT is something I will need to do. I love that you installed an air compressor! I just purchased a Porter Cable 150 psi. also after experiencing tire problems during our last trip. The only downfall- we don't have a generator, so I am going to install an inverter to run the compressor in a pinch. I would think that both batteries could manage without too much draw? Please correct me if I'm wrong.
 

porthole

Retired
By the time you buy a big enough inverter and batteries to run a compressor, you might be better off with a 12-volt compressor setup.
 

Carleen

Well-known member
By the time you buy a big enough inverter and batteries to run a compressor, you might be better off with a 12-volt compressor setup.

Good to know. We have a small Honda Gen, but it isn't enough to run AC's so we don't typically bring it. I think it might be time to look at a generator for the trailer. It would be nice to have AC for boon-docking. Thanks for the info!
 

szewczyk_john

Well-known member
I also have the porta-cable 150 PSI compressor in my unit. I have both a generator and an inverter so I do not have any issue with running my compressor when needed but I will also state that this model compressor really does hold the air pressure for long periods of time. I always run my compressor before a trip and let it run before we pack up to leave for the return trip home. This way you at least have pressure to top off a tire, add air to air bag suspension parts and/or air assisted pin boxes and/or hitches.
 

Bones

Well-known member
This is what we installed in our ElkRidge, specifically to run a compressor on the road. Took it out when we sold the rig, and haven't installed it yet in the new BC. Could easily hook it up to the battery if needed in a pinch.


http://www.aimscorp.net/2500-watt-power-inverter-with-built-in-extension-cord-12-volt.html

Sent from my iPhone using Tapatalk

I like the idea of just the inverter. Less weight and you would not use it all the time so the truck can charge the batteries back up again.
 

porthole

Retired
Microwave fell off the the cheesy pedestal again, and this time several more ff the trim standoffs broke.
These micros are actually held into the cabinet by the trim piece!

Don't have any pictures of the pedestal and such, but what I did was use long bits and deck screws and ran screws through the micro's rubber feet into the pedestal bosses. I finished breaking off the 1 or two spacers on the trim and used deck screws and plastic trim caps.

I get these caps at our marine supply stores, but I'm sure they are available in many places.
 

Attachments

  • Micro_repair_1.jpg
    Micro_repair_1.jpg
    114.1 KB · Views: 100
  • Micro_repair_12.jpg
    Micro_repair_12.jpg
    203.1 KB · Views: 99
  • Micro_repair_13.jpg
    Micro_repair_13.jpg
    164.2 KB · Views: 94
Top