Refrigerator Water Line and shut off valve

Ann&Ted

Well-known member
I have several leaks in the vinyl 1/4 inch line that I installed the plastic connectors in order to repair the leaks. Fortunately, they drip. Not as bad as the hard spray that a small hole in the line causes. After 2 leaks, I realize that I need to replace the line between the 2 valves (1 is shown in the picture). Has anyone every just replaced the line between valves, without replacing the valve, or the entire line from refrigerator to water tank? I have not been able to find this type valve on the internet so am not sure how to just pull out the water line and reinstall a new line without breaking the valve. I may be as easy as just yanking out the line from the valve, but if I break the fitting, I will need to get new valves. Any suggestions before I try and break something?
Thanks for any information.
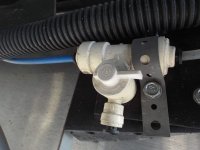
DSCF2258.jpg
 

danemayer

Well-known member
Hi Ted,

That valve appears to be the drain valve located under the slide. Heartland put it there with the thought that by opening that valve, you could drain all the water out of the refrigerator, thereby winterizing it.

I think if you try doing so, you'll find out it's not effective. The refrigerator has a filter and a chilling coil that need to have the water evacuated to winterize. It also has to drain the water from the under-sink cutoff and tee.

If the valve doesn't completely drain the system you might find it easier to eliminate it when you put in the new tubing.

Our Residential Refrigerator user guide has instructions on how to winterize a residential refrigerator.
 

jbeletti

Well-known member
Ted - I've always removed that valve. You can use a 1/4" x 1/4" push-fit splice to put in its place.
 

Ann&Ted

Well-known member
Dan and Jim, thank for your input. I know the valve's are to drain the system for winterizing. My question is has anyone replaced the vinyl tube between the valves. I have had two leaks in the that vinyl tubing and the 1/4 x 1/4 plastic connectors will leak slowly after I used them.

Jim, by your answer, it sounds like you just deleted the valves completely. Is that right. Wouldn't that keep you from draining the system in the winter?

Anyway, I may need to buy two new valves if I cannot disconnect the line from the valve itself without breaking the valve.

Thanks y'all.
 

jbeletti

Well-known member
Ted,

When I winterize, I use compressed air to blow the lines. This includes the refer line.

On the last two coaches, I've replaced the 1/4" poly line with stainless steel braided line for residential refrigerator ice makers.

Click the Mod Index link in my sig below and follow the link in the index for mod #8.
 

travlingman

Well-known member
To get the line out of the valve, push the line and the black piece into the valve. Then take your fingers and hold the black piece that goes around the line in and pull the line out.
 

Ann&Ted

Well-known member
i did the easy fix. Just replaced the piece of vinyl tube between the two drain valves. Its only about 3 feet long. I had never played with the plastic valves before and did not know how easy it is to remove the old tubing and replacing it. I couldn't find that type valve in any store to test, and the quick plastic connectors that I have used in the past, always leaked. I didn't have a lot of faith in replacing the tubing to begin with, since I expected it to leak as what happened with the connectors, but, the new tubing went in and does not leak.

Basically though, for a unit that is supposed to be a 365 living 5th wheel, that ice maker water line being mounted to the outside frame of the 5th wheel is a very poor design. I still have not found the shut off valve for the line. I follow it back along the frame to where it goes thru the frame and what I figure into the fresh water tank. I guess I need to do more investigating. All I know is that there is about 10 feet of exposed vinyl tubing.
 

Ann&Ted

Well-known member
I just looked under the kitchen sink. There is no extra valve. They must have hid it very well. I tried to look behind the cabinets and drawers, very difficult unless you want to remove everything. The only thing I found was a copper tube which I assume is the gas line for the stove/oven. I could only see about 6 inches of that before it went behind the frame and behind the oven. Oh well, something for another day.

Thank you everyone for you help.
 

jbeletti

Well-known member
Ted - Dan's answer is accurate. I have the same coach as you. Let me know if you'd like me to snap a picture of my valve and location.

With regard to the ice maker line having to be outside the coach in order to get water to your refer in the slide - this is fairly typical for RVs with refers in the slides. There are exceptions but they are generally floor plan specific.

If you have any thoughts on a better ice maker route for this floor plan - please share your thoughts.

I replaced my OEM line with stainless steel braided line and have not looked back. In several coaches I've done this in, it's never leaked. On the current coach, in sub-freezing weather where I'd forgotten to blow the line out, the stainless steel braided line never froze and burst either. I got lucky there.
 

danemayer

Well-known member
Picture at the top of page 17 of the Landmark 365 Mid-2017 user guide in this folder. If necessary to remove a drawer, the releases are usually a black lever located on the drawer rails.
 

Ann&Ted

Well-known member
Thanks Jim, Yeah, I guess the only difference would be the year of the unit. Mine is a 2015. I can see needing to run the hose as they did due to the fridge being in the slide. The only way to run the tubing internal completely would be if the fridge were in the rear of the unit as in RVs with the rear kitchen. Then you could run the entire line under within the undercarriage with the other water pipes, thus being protected by the insulation. I am lucky enough to live in Southern Arizona so we don't have to worry about many freezing days. Our biggest item is the tube drying out so when you open and close the slide, the flexing could cause the tube to break, as was the problem this past week.

- - - Updated - - -

Thanks Dan, I will pull that drawer tomorrow and take a look.
 

jbeletti

Well-known member
Ted - if you roll in with the parts, I'd be happy to assist you in replacing your plastic line with the stainless steel braided one in Amado, should time and weather allow.

Parts you'll need to supply and bring with you:
- 1 ea 20' section of stainless steel braided line - Lowes link
- 1 ea 10' section of stainless steel braided line - Lowes link
- 1 ea compression coupling union - Lowes link

What I'll supply:
- All tools
- Teflon tape
- Underbelly tape
- Tie-wraps
- 1/2 of the labor
 

Ann&Ted

Well-known member
Jim, thank you very much. I will get the parts and bring them. If we have time to install them, that would be great. If not, there will be another chance at a later rally.

Thanks again.
 
Top