This weekend the wife and I declared the roof of our 2011 cyclone 3010 36' trailer so I figured I'd share.
3 weeks ago I replaced my skylite over the shower, which was a pretty easy experience. So while doing that I resealed all the vents as well.. Spring all that we noticed how the white roof was starting to spider web and the black was coming thru. So it was a great time to coat the roof. I bought 4 cans of part 2 edpm coating and 2 quarts of part 1 from amazon. I also purchased a roll of 9' x 400' of 0.31mm plastic and a roll of 2" frog tape. I found rolling out the plastic quite easy this way, especially with 2 people.
The day before we went to the home improvement store and had the part 2 cans shaken, big help. We put tape over the front and rear roof trim pieces. I decided not to put the coating on those pieces. For the rear piece and sides I coated down the the beginning of the Camco trim inserts.
I laid the box of plastic at the front of the trailer and pulled it around to the back of the trailer. I tape the plastic to the rear then worked my way around the trailer. What worked out good for us is we have side roof gutters on the trailer so we taped the plastic under the bottom of it. When we rinsed part 1 off of the roof most of the rinse went out the gutters and the pressure washer wasn't able to pull the tape off. We let that dry for an hour.
The wife edged in the vents and such while I went around outside and did the edges. The first coat of part 2 we used a 3/8" nap roller and a plastic paint tray. Rolled it on like regular old house painting. we used a 1.5gal for the first coat. We let it dry a couple hours. For the next 2 coats we poured the part 2 out of the cans straight on the roof and rolled it out. This works pretty good and would recommend doing it that way. We used another 1.5 gals on the second coat which included a second edging in as well. We let that dry about 1.25 hours. Since I had the 4 gal we put that on as well.
We started at 7:30am and the last coated was started about 5 pm. Sunset was at 8:30pm and the temp was about 87degs.
Things that came to mind or would change.
Plastic wrap the night before.
We worried if the roof was clean enough. This didn't seem to matter. Make sure your sprayer is adjusted prior to spraying part 1. I wasted a lot of product adjusting sprayer.
Take the part 2 to the paint store and have shaken. This material is thicker then cake batter but thinner then cake frosting, so its hard to stir.
If I had to do this again I'd try using the thinner sausage rollers with a smaller nap, so not to waste as much part 2. Also the nap we used left the roof with a decent texture which will collect dirt.
Pour part 2 directly to the roof and rolled out.
Our last coat needed to be down earlier. 3 hours of daylight isn't like 3 hours of direct sun. We had a little bit of morning due that made the last coat semi sticky. A couple of hours the next morning dryer it out and was OK. With the extra plastic I had left over I was temped to last it over the roof before bedtime but wasn't really necessary but is an option.
In the end I wished I had done this years ago. The coating has a rubbery texture to it. Hopefully will last many years and help keep the sides cleaner. Its an all day project an I'd recommend 2 people. Not a based job but long.
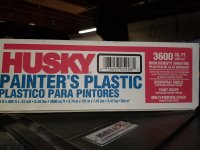
Plastic we bought.
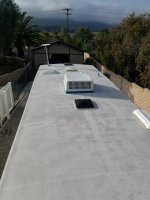
Roof before cleaning.
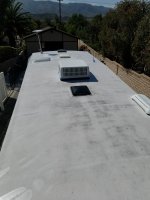
Roof after cleaning
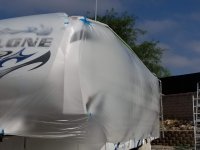
Plastic taped on under gutters.
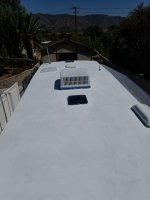
First coat part 2
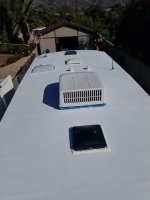
After second coat
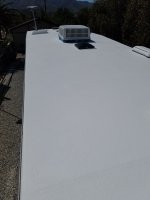
After 3rd coat
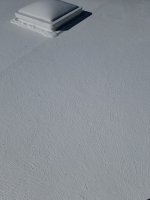
You can see the texture the roller left.
3 weeks ago I replaced my skylite over the shower, which was a pretty easy experience. So while doing that I resealed all the vents as well.. Spring all that we noticed how the white roof was starting to spider web and the black was coming thru. So it was a great time to coat the roof. I bought 4 cans of part 2 edpm coating and 2 quarts of part 1 from amazon. I also purchased a roll of 9' x 400' of 0.31mm plastic and a roll of 2" frog tape. I found rolling out the plastic quite easy this way, especially with 2 people.
The day before we went to the home improvement store and had the part 2 cans shaken, big help. We put tape over the front and rear roof trim pieces. I decided not to put the coating on those pieces. For the rear piece and sides I coated down the the beginning of the Camco trim inserts.
I laid the box of plastic at the front of the trailer and pulled it around to the back of the trailer. I tape the plastic to the rear then worked my way around the trailer. What worked out good for us is we have side roof gutters on the trailer so we taped the plastic under the bottom of it. When we rinsed part 1 off of the roof most of the rinse went out the gutters and the pressure washer wasn't able to pull the tape off. We let that dry for an hour.
The wife edged in the vents and such while I went around outside and did the edges. The first coat of part 2 we used a 3/8" nap roller and a plastic paint tray. Rolled it on like regular old house painting. we used a 1.5gal for the first coat. We let it dry a couple hours. For the next 2 coats we poured the part 2 out of the cans straight on the roof and rolled it out. This works pretty good and would recommend doing it that way. We used another 1.5 gals on the second coat which included a second edging in as well. We let that dry about 1.25 hours. Since I had the 4 gal we put that on as well.
We started at 7:30am and the last coated was started about 5 pm. Sunset was at 8:30pm and the temp was about 87degs.
Things that came to mind or would change.
Plastic wrap the night before.
We worried if the roof was clean enough. This didn't seem to matter. Make sure your sprayer is adjusted prior to spraying part 1. I wasted a lot of product adjusting sprayer.
Take the part 2 to the paint store and have shaken. This material is thicker then cake batter but thinner then cake frosting, so its hard to stir.
If I had to do this again I'd try using the thinner sausage rollers with a smaller nap, so not to waste as much part 2. Also the nap we used left the roof with a decent texture which will collect dirt.
Pour part 2 directly to the roof and rolled out.
Our last coat needed to be down earlier. 3 hours of daylight isn't like 3 hours of direct sun. We had a little bit of morning due that made the last coat semi sticky. A couple of hours the next morning dryer it out and was OK. With the extra plastic I had left over I was temped to last it over the roof before bedtime but wasn't really necessary but is an option.
In the end I wished I had done this years ago. The coating has a rubbery texture to it. Hopefully will last many years and help keep the sides cleaner. Its an all day project an I'd recommend 2 people. Not a based job but long.

Plastic we bought.

Roof before cleaning.

Roof after cleaning

Plastic taped on under gutters.

First coat part 2

After second coat

After 3rd coat

You can see the texture the roller left.
