New Storage Access Door Install

Ray LeTourneau

Senior Member - Past Moderator
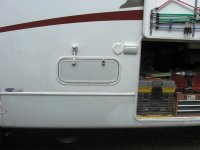
I knew there was an area under the WC where there is a lot of room and houses the converter and other goodies. It's always been something I've had on the back burner to do. While in Goshen at the last rally, I found the perfect door for $3.00. Yes, you heard right.

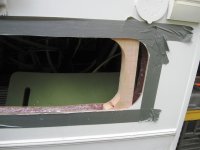
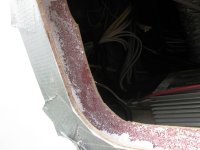
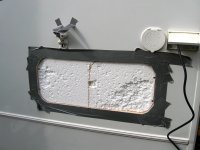
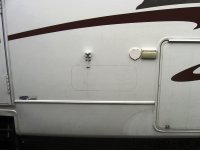
I had to wait for a damp morning to determine if there were any aluminum studs where the door was going. I didn't think there was but I wanted to be sure. I started by marking the hole and taping around it so when using the jig saw I wouldn't damage the exterior. Heartlands lamination process works great. I had a heck of a time removing the outer plywood from the foam. Once I had the foam removed I cut out the interior panel.
It was good to find out there was 1-1/2 inches between the walls. That made it easier to frame out. Once I had the frame pieces cut out and inseted, I made sure the door fit before gluing them in place. Once the glue was dry, I set the door and marked and pre drilled the screws.
I put a bead of caulk on the inside of the frames face plate, stuck it in the hole and screwed it down. I then caulked the perimeter of the frame and there you have it.
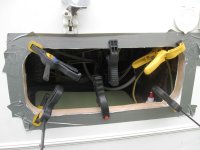
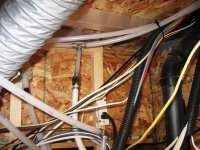
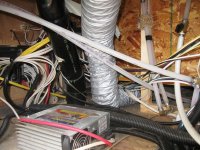
Now I get to clean up the rats nest in that area. No definite plan for what will be stored there but at least it's there when I need it.
 

Attachments

  • IMG_1053.JPG
    IMG_1053.JPG
    158.8 KB · Views: 267
  • IMG_1049.JPG
    IMG_1049.JPG
    164.8 KB · Views: 251
  • IMG_1047.JPG
    IMG_1047.JPG
    157.4 KB · Views: 237
  • IMG_1046.JPG
    IMG_1046.JPG
    179.9 KB · Views: 241
  • IMG_1042.JPG
    IMG_1042.JPG
    276.5 KB · Views: 249
  • IMG_1041.JPG
    IMG_1041.JPG
    291.3 KB · Views: 249
  • IMG_1039.JPG
    IMG_1039.JPG
    196.4 KB · Views: 231
  • IMG_1038.JPG
    IMG_1038.JPG
    155.8 KB · Views: 229

TedS

Well-known member
Nice job on the door.

The rats nest is on my list of things to clean up. I can't help thinking that all that dangling wire and tube uneccessarily stresses the connectors and fittings.
 

JohnDar

Prolifically Gabby Member
Nice job, Ray. Looking at one of your basement shots, you might consider taking that 90 deg. bend out of that heater duct flex hose, along with some of the excess hose. Put a metal adjustable elbow in there and give it a smooth transition. That will improve the air flow in the duct.
 

2psnapod2

Texas-South Chapter Leaders-Retired
I worked in the residential heating area back some time ago running plenty of 6 in pipe. While I was working in my basement area, I was thinking that maybe running the complete runs that I can get to in hard pipe and insulating them would help. I have not had to use the heater yet so I will see if it needs some help first.
 

rebootsemi

Well-known member
Great job Ray and I thought my rats nest was bad before three days of clean up and a few bags of wire ties and pex fittings. I just love how in pic 5 you see the 120 V plug for the inverter nailed to the up right, classic just classic bet that air duct would actually pass some air if it were straighten out a bit.
 

2psnapod2

Texas-South Chapter Leaders-Retired
Great job Ray and I thought my rats nest was bad before three days of clean up and a few bags of wire ties and pex fittings. I just love how in pic 5 you see the 120 V plug for the inverter nailed to the up right, classic just classic bet that air duct would actually pass some air if it were straighten out a bit.

What about that expensive pex tubing holder? A piece of carpet must do just fine.
 

rebootsemi

Well-known member
What about that expensive pex tubing holder? A piece of carpet must do just fine.

Need to move that inverter up on blocks just in case one of those quality pex tubing connection starts to leak. These people think that the black flex wire cover is a cure all for crap installations. I removed almost all of it and bundle tied all the wiring.
 

Ray LeTourneau

Senior Member - Past Moderator
Pretty funny stuff eh? Ya have to consider this is a 2007 rig. One of my first (self inflicted) disasters caused some extra water to overflow from the stool. I removed and cleaned out that flex duct. You might have noticed the broken duct tape? Anyway, I actually get great airflow from that duct.
A lot of the wiring is too short to reroute and clean up but I'll do what I can with it. I have an extra 110 romex with red tape wrapped on it. I'm thinking it would have been for the fireplace that I didn't order or maybe for the central vac? I'll have to see if it's coming from the breaker box or the area under the steps.
I also noticed that they have a valve on the water line going to the door side spray port. I turned it off as I never use it, but now I'm thinking of other ways to take advantage of having water there. The disconnect for the spray port seemed to always be difficult to use. I can't even find the blue hose now.
Anyway, I'm glad I have the door now and have more things to play with. I wish I would have made it bigger.:rolleyes:
 

scotty

Well-known member
Dang Ray, now I have another project to work on. I already stole all your storage inside the garage tricks with the racks. Anyway, this is what makes these forums so great
 
Top