You are using an out of date browser. It may not display this or other websites correctly.
You should upgrade or use an alternative browser.
You should upgrade or use an alternative browser.
What did you do to your camper today?
- Thread starter MagnoliaTom
- Start date
MP_CS
Well-known member
All it takes is a little time, problem solving and a couple beers and almost anything will fit where you want it.
There might have been more than a few involved, lol....
Diamondjim
Well-known member
MP_CS I see you have a WilkinsRV sticker on your rig as do we. You must be closer to them than we here in FL. Bought our 5er at their Churchville location. It was under expansion construction, adding 6 more service bays, double what they had.
Nice addition to your entry. Sometimes I think we are inspired by being told it can't be done. Good on you.
Keep up the good work.
The EMS installation is very cool, sorry, can't go back to get installers handle, nicely done with adding circuit breaker etc. I love to mess with wiring, and problem solving too.
Jesstruckn/Jesstalkn
Well-known member
Glad to hear you got them drilled and installed. Now you can enjoy them.Installed our new RV Snap Pads today. Did the drainage mod before we snapped them on the landing gear. Bought a single Forstner bit at Lowe's on sale for $4 to drill the holes. Definitely made for a clean hole.

Sent from my XT1254 using Tapatalk
RottsNScotts
Well-known member
Looking good Janet! How are Boomer and Abby taking to the full time life?? Hope all is well with you and hopefully we will get to see you at the rallies coming up this summer!
Rod
Abby likes meeting a lot of people who want to pet her, Boomer is learning to like it as well. Really wish more parks had dog off leash areas as Boomer truly needs to get some serious running time in! I am holding off doing roadwork with him until I get his hip and elbow x-rays done which should be soon...
Right after I stop running amok! I have been going pretty much non-stop since the house closed in February! I tell my friends I am more TIRED than re-tired and it isn't going to improve until mid-June! Might be even later than that if the dealer isn't ready to do my warranty work the first 2 weeks of May!
The good part is that much of it is visiting training for Boomer. I am heading back to Delhi, CA to train with Joel Monroe around the 21st of May then a dog show in Placerville while he is at the DVG Regionals in Colorado, back to his place for a couple of days then to the Placer County Sch Club for DogStock and back up to the Eugene area for a workshop he is giving there!
I'll get this bad dog trained one way or another! Too bad he is SO talented, as it turns out; lots of responsibility and hard work ahead! But it sure is fun to work him and he loves it.
Another Rottie and owner Joel trains got their IPO I this last weekend at the Menlo Park club; 99-96-99! I am so excited for her!
- - - Updated - - -
Nice!!! My daughter and her family live in Edgewood and we are flying out there Monday afternoon for a visit.
The furkids and I are currently at the Puyallup Fairgrounds where we will be until May 2. Decided to stick around for the RV show next Thursday through Sunday for the seminars as there are some things I have not yet figured out!
Would love to meet you!
Kbvols
Well-known member
Fixed two broken plastic tracks that hold the wires under the slides. I used hinges like I've seen from prior posts on the forum they worked great. Also cleaned off the tracks for the slides and lubed them with dry. Powdered down the slide seals and fixed some broken wires.
Sent from my iPad using Tapatalk
Sent from my iPad using Tapatalk
VKTalley
Well-known member
The furkids and I are currently at the Puyallup Fairgrounds where we will be until May 2. Decided to stick around for the RV show next Thursday through Sunday for the seminars as there are some things I have not yet figured out!
Would love to meet you!
That's our favorite place to stay when we haul our rig out there in August! Our granddaughters love us being there since there are several place to eat within walking/bike riding distance.
I'll PM you my phone number. We will be there for a week. Give me a call or send me a text message and let me know when's a good time to meet up.
HornedToad
Well-known member
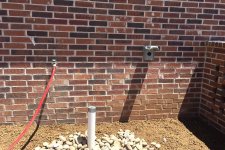
These waste pumps have redefined the laws of gravity and the 1st rule of plumbing... Yes it does run uphill!!!
I'm going to have to landscape a dry river bed lined with boulders below the grade of the yard to have a level shot from the sidewalk/curb to the sewer tap.
I added a 50 amp plug to the side of my old house, but the sewer tap was in the alley and the hose bibs were over 50 ft away. It's going to be nice having everything in one place, just like a campground.
What did I do FOR my camper today???
Full hook ups at home...
Hose bib = $0, 3 included with house
Sewer Tap = $0, extended off laundry room
50 amp plug = $100 materials + lunch for the electrical crew
Being able to plug in / fill up to get ready for a trip &
clean up / dump after a trip...
Priceless!!!
View attachment 42463
View attachment 42464
HornedToads RV Park is open for business...
Full Hook-Ups, 72 hour limit by city ordinance.
Today I called my old storage yard to get my space back...
After 9 months of full timing, we're glad to get back into a sticks and bricks.
Attachments

mlpeloquin
Well-known member
I installed new Glow Step Revolution from Torque Lift International. Almost effortless to use and very stable. Sorry the pictures are upside down, but the I phone..... Always right side up on Apple devices. The steps adjust in height at the top and the feet also adjust. Just what my wife needed. She has a very high amputation and needs a stable surface. No more bounce! Did the entire install by myself. Total time took about an hour and a half.


TravelTiger
Founding Texas-West Chapter Leaders-Retired
I installed new Glow Step Revolution from Torque Lift International. Almost effortless to use and very stable. Sorry the pictures are upside down, but the I phone..... Always right side up on Apple devices. The steps adjust in height at the top and the feat also adjust. Just what my wife needed. She has a very high amputation and needs a stable surface. No more bounce!
View attachment 44700View attachment 44701
Looks great! Did you need shims? How do they compare to the OEM Steps?
Westwind
Well-known member
Opened the wall inside the storage compartment to get to the back of the stairs so I could install a piece of plywood to block the mouse highway into the stair drawer, caulked every other opening I could find including one that brings the wiring from the under outside stair light through the frame into the area behind the wall, another mouse highway. We had a major problem with mice this past fall which continued when we got to Florida, yes we brought a dead one (SMELL) and live one (caught that sucker) with us. I have to go over the whole undercarriage looking for holes into the undercarriage and frame, I found many more today. After reinstalling the vacuum on it's base I accidently pinched the switch wiring so I had to cut and reconnect that to repair my damage.
Also checked each 12V spade connection in the fuss box. Had them so lose they were falling out and disconnecting, we had lost our recessed ceiling lights and that is when I started on that project. Ended up replacing two spade connectors and tightening up all others. Hopefully that should solve that problem - Lights work. Repacked the compartment so I can have my garage stall back.
Next will be repairing the delamination on the awning with white gorilla tape. Washing the roof and FW and waxing it. the work is never done with these things.
JohnD
Moved on to the next thing...
I was going to dewinterize the Prowler today as we have a Colorado HOC Rally in two weeks . . .
But it has been snowing all day so I just stayed inside and did a few things that I have been putting off.
Plus cleared a couple of TV episodes and movies off of the Genie that I needed to watch!
But it has been snowing all day so I just stayed inside and did a few things that I have been putting off.
Plus cleared a couple of TV episodes and movies off of the Genie that I needed to watch!
mlpeloquin
Well-known member
Looks great! Did you need shims? How do they compare to the OEM Steps?
Yes I made shims. I had on hand 1/8"X1.5" stock aluminum. Marked off the hole locations and drilled them oversized using a step drill. Took about 15 minuets to make using a step drill. Used one on each side. The second one went in a bit tight. If I did it again, I wound have used the 1/8" and then a 1/16" thick stock.
The stairs work well. Walking up the stairs you notice that they are quite solid. I spent some time in the fifth wheel and when stepping out for the first time, I did not get the “bounce” that I was used to. It was a welcome, but surprisingly different feeling. This is exactly what I was looking for. I became so used to the bounce I hit the first step hard! No need to do that any more. This will help my wife a lot. She has a prosthetic leg. She had a very high amputation when she was 15.
I took my time installing them. It took 15 minuets to remove the plastic support plates for the J panels. Several of the screws were stripped. I was able to do the instillation by myself by using two of my 6X24X24 inch blocks. I was able to set the blocks on their sides to support the step assembly. The step assembly width is about ¼” less then the stair mounting opening. Since the fifth wheel mounting frame is thin metal and would deform easily, I made the shims. The shims were slid up between the steps and the mounting plate using a piece of 1/16” aluminum stock that I had on hand. The second shim went in a bit tight. Two 3/32” shims or one 1/8” and one 1/16” shim would have made the task a bit easier. Prior to tightening the mounting bolts, I adjusted the front of the steps to be even with the front. I had to make sure that the locking pin can clear the side and trim. The whole process took about a half hour shims and all. It took about fifteen minuets to put the J panel support panels back since I wanted to match the holes and not add any. Adding new holes would have been quicker, but it may have allowed water to intrude. So total working time was about an hour. Add another 15 minuets for tool setup and cleanup.
If you want solid steps, I highly recommend the GlowStep Revolution. To deploy them pull the locking pin out and lift the locking lever which is easy. The lever lifts effortlessly. Hold the lever up for the first few inches while pulling the stairs straight out. This does not take much to pull them out. The movement is smooth and almost effortless. Set the stairs down and adjust the feet and the upper part of the stairs if required. The upper part of the stairs adjust by lifting the locking lever and the feet are adjusted by pushing in the spring locking pin.
I got rid of five pounds of metal, and then the 14 pounds of the portable/adjustable step as well. It was never an ideal set up.
TravelTiger
Founding Texas-West Chapter Leaders-Retired
Yes I made shims. I had on hand 1/8"X1.5" stock aluminum. Marked off the hole locations and drilled them oversized using a step drill. Took about 15 minuets to make using a step drill. Used one on each side. The second one went in a bit tight. If I did it again, I wound have used the 1/8" and then a 1/16" thick stock.
The stairs work well. Walking up the stairs you notice that they are quite solid. I spent some time in the fifth wheel and when stepping out for the first time, I did not get the “bounce” that I was used to. It was a welcome, but surprisingly different feeling. This is exactly what I was looking for. I became so used to the bounce I hit the first step hard! No need to do that any more. This will help my wife a lot. She has a prosthetic leg. She had a very high amputation when she was 15.
I took my time installing them. It took 15 minuets to remove the plastic support plates for the J panels. Several of the screws were stripped. I was able to do the instillation by myself by using two of my 6X24X24 inch blocks. I was able to set the blocks on their sides to support the step assembly. The step assembly width is about ¼” less then the stair mounting opening. Since the fifth wheel mounting frame is thin metal and would deform easily, I made the shims. The shims were slid up between the steps and the mounting plate using a piece of 1/16” aluminum stock that I had on hand. The second shim went in a bit tight. Two 3/32” shims or one 1/8” and one 1/16” shim would have made the task a bit easier. Prior to tightening the mounting bolts, I adjusted the front of the steps to be even with the front. I had to make sure that the locking pin can clear the side and trim. The whole process took about a half hour shims and all. It took about fifteen minuets to put the J panel support panels back since I wanted to match the holes and not add any. Adding new holes would have been quicker, but it may have allowed water to intrude. So total working time was about an hour. Add another 15 minuets for tool setup and cleanup.
If you want solid steps, I highly recommend the GlowStep Revolution. To deploy them pull the locking pin out and lift the locking lever which is easy. The lever lifts effortlessly. Hold the lever up for the first few inches while pulling the stairs straight out. This does not take much to pull them out. The movement is smooth and almost effortless. Set the stairs down and adjust the feet and the upper part of the stairs if required. The upper part of the stairs adjust by lifting the locking lever and the feet are adjusted by pushing in the spring locking pin.
I got rid of five pounds of metal, and then the 14 pounds of the portable/adjustable step as well. It was never an ideal set up.
Great write up!
We too added the Glowstep Revolution steps.
Torklift does have a shim kit that contains shims and longer bolts. I don't think it's an added cost, but you need to have your measurements so they can send you the right number. We had to add three shims each side. Below is a pic of the shims attached (they come with double sided tape) to the side of the Step frame, prior to install.

After having our steps about a month full-timing now, I can honestly say I'm pretty impressed with them. They do not flex or bounce as you enter and exit. You cannot "feel" someone going in our out of the coach.
They have groves in each step that create a secure grip, even when the steps are wet. This is important, because we've fallen off wet steps before!
I can't wait to see how they work when traveling... But it may be another month before we get to try them out that way.
mlpeloquin
Well-known member
The steps sure do grip. It was that first step without thinking that I expected the bounce and slip. I nearly launched myself off the top step. In and out a lot and they are firm and safe.
Second project was to replace the gaskets on the kitchen sink tank gray valve. If the assemblers put the valve where it was designated on the diagram, it would have been a much easier job. Look at the diagram. The valve to the right is where it was designed to be. If it were installed there, it would have been a snap to do. Lots of room and clearance. It was put next to the outlet. Yes I cut the pipe, otherwise the gaskets will pop out of position when you try and force the pipe into the valve. It has to go in at an angle and the pipes don't bend easy!

This is where I found it.

Notice that the upper right nut is almost impossible to get to. Taking it off was not easy and only lots of luck aligned it so I could thread it on. Is isn't a wonder that RV repair shops charge a fortune to replace valve gaskets or valves. The blue cold water PEX runs over the top of the fastener and is smashed against the duck work along with the wiring.

Finished with aluminum flashing, lap joint seal, and Gorilla Tape. Got to love that stuff!

Second project was to replace the gaskets on the kitchen sink tank gray valve. If the assemblers put the valve where it was designated on the diagram, it would have been a much easier job. Look at the diagram. The valve to the right is where it was designed to be. If it were installed there, it would have been a snap to do. Lots of room and clearance. It was put next to the outlet. Yes I cut the pipe, otherwise the gaskets will pop out of position when you try and force the pipe into the valve. It has to go in at an angle and the pipes don't bend easy!
This is where I found it.
Notice that the upper right nut is almost impossible to get to. Taking it off was not easy and only lots of luck aligned it so I could thread it on. Is isn't a wonder that RV repair shops charge a fortune to replace valve gaskets or valves. The blue cold water PEX runs over the top of the fastener and is smashed against the duck work along with the wiring.
Finished with aluminum flashing, lap joint seal, and Gorilla Tape. Got to love that stuff!
oldelmer1
Well-known member
I was having problems with my slides/level up going in and out, the breaker kept popping. Put my AMP meter onto the cable and found that the draw was a good 90 AMPS.
Replaced the 50 AMP breaker with a Bussmann 50 AMP breaker and now they both go in/out with no problems at all.
Replaced the 50 AMP breaker with a Bussmann 50 AMP breaker and now they both go in/out with no problems at all.
Similar threads
- Replies
- 5
- Views
- 179
- Replies
- 10
- Views
- 465