Hello everyone. Many may disagree with what I'm about to write but remember, it's only my personal opinion. I have a 2009 Cyclone 3914... gigantic and heavy. I dreaded my first flat and sure enough, it happened about 1500 miles from home at a very inconvenient time (of course). Fortunately there was a garage nearby but they didn't have enough "jacking power" to get my trailer high enough (using the frame) so we were stuck. I came up with the idea of "helping" them by driving the good wheels up on a couple of planks to give added height, then see if they could block and jack to the correct height. It "sort of" worked and we were soon on our way again.
So I began to think long and hard about tire changing and how to make it a one-man operation, as easy as possible. Hours of contemplation provided me with a solution that I am extremely happy with. I have used it several times now with great success. In fact, before I describe it let me say, I had to have two tires replaced at the same time, on the same side, and Discount Tire in California couldn't even get the vehicle jacked high enough so I offered to "lift" it for them, using my system, and they were extremely happy with the result. They said they had never changed tires on an RV that easily.
My solution:
I purchased 2" x 12" pine boards (length isn't important yet) and cut them, and bolted them together, to make two separate mini-ramps. Each ramp is built with four layers of the 2" x 12" pine boards. (Twelve inch width was chosen, just for added safety. I found 6" or 8" widths worked but I didn't like the precision needed to get squarely on top of them. And four layers of 2" boards gives an overall height of about 6" off the ground because 2" boards aren't exactly 2"!)
The first ramp is measured long enough to fit comfortably under two of the wheels (I have three axles so three wheels in a row on each side). For safety reasons, the ramp extends in front of one wheel by about eight inches or so and then beginning about 6 inches on the other end of the second wheel the ramp begins to taper down to the ground. I accomplished the taper by simply cutting each board at a shorter lenght, about 3 - 4 inches shorter, so it presents sort of a stair step look.
The second ramp is constructed the same but it only fits one wheel instead of two.
Now here is how I use them. If the front or rear tire is flat I use the first, large ramp and either pull forward or back up on it until two wheels are on the ramp. This lifts the third, flat tire completely off the ground. If the middle tire is flat then I begin with the large ramp as above and pull forward until the front two tires are on the ramp. As soon as both wheels are on the ramp I place (and align) the smaller ramp behind the rear wheel, then back up until the rear wheel is on the small ramp. That means that the rear wheel is supported off the ground on the small ramp, the front wheel is supported off the ground on the large ramp, and the middle wheel is hanging completely free spinning off the ground between the two ramps.
All that's left to do is pull out the trusty air hammer (I have a compressor on my truck) and change the tire with no sweat.
This process is so amazingly fast! It actually takes me longer to get the spare tire out from under the RV than it does to get the RV up off the ground ready to change the tire.
These ramps are heavy because they are solid pine wood, and the are large (approximately six feet long for the large one and about three feet long for the small one) but since I have a nice big truck I have no problem carrying them around on the truck bed.
I have also had my frame and axles inspected after using this system for four or five tire changes and there is no damage whatsoever so I am a "happy camper" so to speak. I can't imagine having to change a tire by actually jacking it up again.
Well, that's my "two-cents" worth. Hope it is useful to someone else.
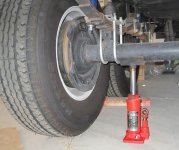
 lease note my jack is rated @ 4 times more than the lifting actual lifting weight. Why lift half the weight of the RV 8"-10"+ inches when 1" is all that needed. (alot safer too).