What did you do to your camper today?

windviewer

Well-known member
read as many threads as i could in anticipation of picking up our first (minor) rv this friday (hopefully) to be prepared.
 
Last edited:

Bones

Well-known member
Added a second set of 4 tread steps to the Elkridge. What a difference. Don't need to carry around a separate step anymore. Thanks Jim & Colleen for the steps.

20kfadk.jpg


206h72h.jpg
Nice
 

jmgratz

Original Owners Club Member
I put foil insulation in the inside of the outdoor entertainment center and cut foil insulation and velcroed it to the inside of the of the shower skylight. That skylight allows alot of heat to radiate into the bathroom/hallway between the kitchen and bedroom. Immediately felt a huge reduction in heat entering the RV.
 

windviewer

Well-known member
we use similar material in the plane to keep the heat to a lower level to save the avionics equipment ($$$). saw some foil material today at rv place and was considering it. will wait to evaluate how much heat we get in our rv.

for the plane, the material we use is custom built/fitted for the windows. they friction fit in place, and take about 2 minutes to install/remove. made by kennon. i dont see them making anything currently except for aircraft. maybe the rv world needs a kennon to step up? lots of standard size skylights/vents in use.
 

JWalker

Northeast Region Director-Retired
Well, after losing most of the trailer brakes on the way home from the NY rally, I decided to pull the hubs. Turns out 2 of the Dexter self adjusting brakes were not working. One looked like a grenade went off inside. Pieces everywhere. The other had a magnet issue. The 2 remaining were worn from carrying all the load. Wasn't taking the chance, I replaced everything.

qqoj85.jpg


dmwg38.jpg


25ui3pz.jpg


- - - Updated - - -

Also wanted to add.....thank goodness for Level Up. What a time saver.
 

Hippy

Well-known member
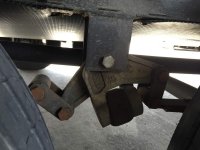
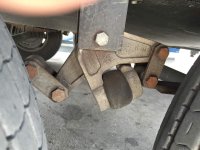
Great job. Word of caution! When you put your wheels on and drop the trailer, drop it slowly one side at a time keeping an eye on the shackles that one or the other doesn't flip on you. This happen to me and I wasn't aware. Luckily it was it was brought to my attention before I wore my tires or did any damage.image.jpgimage.jpgleft & right side.
 

JWalker

Northeast Region Director-Retired
Great job. Word of caution! When you put your wheels on and drop the trailer, drop it slowly one side at a time keeping an eye on the shackles that one or the other doesn't flip on you. This happen to me and I wasn't aware. Luckily it was it was brought to my attention before I wore my tires or did any damage.View attachment 39667View attachment 39668left & right side.

Thanks for the heads up. Just went out and checked. All good. Will keep that in mind from now on.
 

jassson007

Founding Louisiana Chapter Leaders-Retired
Wow. I thought you had just re packed your bearings recently. Glad you caught this before you had any emergency stopping issues.

Btw I would also put some sort of Jack stand or cribbing under frame if you are up in the air an extended time.


Sent from my iPhone using Tapatalk
 

TravelTiger

Founding Texas-West Chapter Leaders-Retired
Btw I would also put some sort of Jack stand or cribbing under frame if you are up in the air an extended time.


Sent from my iPhone using Tapatalk

I agree, that Level-Up is sweet for that but I would add a bottle jack or two on cribbing for a backup safety measure.


Sent from my iPhone using Tapatalk
 

JWalker

Northeast Region Director-Retired
Wow. I thought you had just re packed your bearings recently. Glad you caught this before you had any emergency stopping issues.

Btw I would also put some sort of Jack stand or cribbing under frame if you are up in the air an extended time.


Sent from my iPhone using Tapatalk

I actually had the trucked hooked up. I also had two jack stands and cradle jacks that I would jockey back and forth from frame to under the axles. The problem I had was that the Frame was 30+ inches from the ground and I did not like the looks of the cribbing and jack stands. So I would use my cradle stands under the axles. It looked more stable if something were to give. Only problem is that I could not get to the back of the brake assembly for wiring and adjustment. So I had to remove them and set up Jack stands. The pictures do not show them.
 

jassson007

Founding Louisiana Chapter Leaders-Retired
I figured you had it under control but just wanted to throw that out there.


Sent from my iPhone using Tapatalk
 

JWalker

Northeast Region Director-Retired
Why no on the self adjusters? fill me in please.

I was talking to the owner from my local RV center. He said that self adjusters are great but they tend to keep constant pressure between drum and pad causing for faster wear. He had both on stock. Then talking with some knowledgable HOC members, they explained how easy it was to adjust and they were correct. About 2-3 minutes a tire. I think if I have to do again, I might go disc brakes. Just not in the budget for this year. I burnished them in this morning. Feels like I can stop on a dime. Considering I had virtually no brakes for the last 250 miles of our last trip.
 

Bones

Well-known member
I was talking to the owner from my local RV center. He said that self adjusters are great but they tend to keep constant pressure between drum and pad causing for faster wear. He had both on stock. Then talking with some knowledgable HOC members, they explained how easy it was to adjust and they were correct. About 2-3 minutes a tire. I think if I have to do again, I might go disc brakes. Just not in the budget for this year. I burnished them in this morning. Feels like I can stop on a dime. Considering I had virtually no brakes for the last 250 miles of our last trip.
I've lost my brakes many many times so I know how you feel
 

jmgratz

Original Owners Club Member
Well DW and I washed the RV roof today, and then I washed the whole RV. While washing we noticed the area along the roof line that meets the gutter needed recaulking. So, I recaulked the roof along the sides while DW used some spray on Turtle Wax and did the wax job on the sides. Sure looks better and I used 4 tubes of caulk on the roof sides. Now I have to get on the roof tomorrow and recaulk the front and rear caps.
 

porthole

Retired
Added a landing pad for the Trav'ler antenna. The wheel was leaving a depression on the roof membrane.
Permanent LED on the pin box for my mini flag.
Permanently mounted my solar LED on the Welcome sign
Ran a 12 gauge wire from the junction box directly to the batteries. Still can't get enough current from the trucks charge circuit to the trailer. 14.2 at the junction box which drops to 13 volts with a load.

Finished my "literally on a shelf" rear wheel light project.

WiFi Ranger (WFR) Elite on the roof, WFR Go2 router in the rig, added the new Verizon USB 620L modem to the router and finished it with a cell antenna on the roof.

Prepping the trailer for 2 weeks of dog camp coming up Wednesday. No sewer, no water (easily accessible) and 50 amp service - shared with 10-12 other rigs :cool:
 
Last edited:
Top